はじめに
以前乃木坂のメンバーの顔認識をchainerでやりましたが、今回それを Keras で試してみます。基本的なCNNの実装ってだけで技術的にはkerasの公式とソースはあまり変わりませんが、自分で用意したデータセットを使って学習したいという人は参考にしてください。
全ソースコード下にも書いていますがgithubにも公開しています。
学習の前に
kerasでは画像を扱うために
keras.preprocessing.image
というものをインポートすることでかんたんに扱う事ができますが、これは内部でpillowという画像を扱うパッケージを使っているのでインストールしていない人はインストールする必要があります。
$ pip install pillow
また学習済みのモデルを保存する際、h5pyというパッケージが必要なのでこれもインストールする。
$ pip install h5py
予測する際に普通の画像を入れて顔を切り出してkerasに投げるのですが、opencv3を利用するのでこれもインストールします。
$ conda install -c https://conda.binstar.org/menpo opencv3
データセット
データですが、乃木坂メンバーからとりあえず、秋元真夏、白石麻衣、西野七瀬、生田絵梨花、そして誰やねんって人を大量に入れたやつ
それぞれの画像を300枚ほどあつめてOpencvを利用して顔画像のみを切り取り128×128のサイズにして保存しています。
データはここで公開しときます。
こんな感じの画像
keras のコード
訓練データのフォルダ構造が以下のようになっているとします。
-images
|- the_others
|- 画像1
|- 画像2
|- …
|- akimoto
|- 画像1
|- 画像2
|- …
|- shiraishi
|- 画像1
|- 画像2
|- …
|- ikuta
|- 画像1
|- 画像2
|- …
…
from __future__ import print_function
import keras
from keras.models import Sequential, load_model
from keras.layers import Dense, Dropout, Flatten
from keras.layers import Conv2D, MaxPooling2D, BatchNormalization, ZeroPadding2D
from keras import backend as K
import argparse
from load_images import load_images_from_labelFolder

batch_size = 20
num_classes = 7
epoch = 30

img_rows, img_cols = 128, 128


parser = argparse.ArgumentParser()
parser.add_argument('--path', '-p', default='.\\images')
args = parser.parse_args()


(x_train, y_train), (x_test, y_test) = load_images_from_labelFolder(args.path,img_cols, img_rows, train_test_ratio=(6,1))

if K.image_data_format() == 'channels_first':
    x_train = x_train.reshape(x_train.shape[0], 1, img_rows, img_cols)
    x_test = x_test.reshape(x_test.shape[0], 1, img_rows, img_cols)
    input_shape = (1, img_rows, img_cols)
else:
    x_train = x_train.reshape(x_train.shape[0], img_rows, img_cols, 3)
    x_test = x_test.reshape(x_test.shape[0], img_rows, img_cols, 3)
    input_shape = (img_rows, img_cols, 3)

x_train = x_train.astype('float32')
x_test  = x_test.astype('float32')
x_train /= 255
x_test /= 255


# convert class vectors to binary class matrices
y_train = keras.utils.to_categorical(y_train, num_classes)
y_test = keras.utils.to_categorical(y_test, num_classes)

model = Sequential()

model.add(Conv2D(32, kernel_size=(3,3),
            activation='relu',
            input_shape=input_shape))
model.add(MaxPooling2D(pool_size=(2, 2), strides=2))
model.add(Dropout(0.2))

model.add(ZeroPadding2D(padding=(1, 1)))
model.add(Conv2D(96, kernel_size=(3,3),activation='relu'))
model.add(MaxPooling2D(pool_size=(2, 2), strides=2))
model.add(Dropout(0.2))

model.add(ZeroPadding2D(padding=(1, 1)))
model.add(Conv2D(96, kernel_size=(3,3)))
model.add(MaxPooling2D(pool_size=(2, 2), strides=2))
model.add(Flatten())

model.add(Dense(units=1024, activation='relu'))
model.add(Dropout(rate=0.5))
model.add(Dense(units=num_classes, activation='softmax'))

model.compile(loss=keras.losses.categorical_crossentropy,
                optimizer=keras.optimizers.Adam(),
                metrics=['accuracy'])

model.fit(x_train, y_train,
            batch_size=batch_size,
            epochs=epoch,
            verbose=1,
            validation_data=(x_test, y_test))

score = model.evaluate(x_test, y_test, verbose=0)
print('Test loss:', score[0])
print('Test accuracy:', score[1])

model.save('mymodel.h5') # 学習済みモデルを保存
kerasのコードに関してはほぼほぼ公式サンプルのmnist_cnnと同じです。
load_images_from_labelFolderという、画像が入っているフォルダのパスと画像のサイズと学習とテストの割合を指定してあげると学習データを返してくれる関数を作りました。
import numpy as np
import glob
from keras.preprocessing.image import load_img, img_to_array
import re

def load_images_from_labelFolder(path, img_width, img_height, train_test_ratio=(9,1)):
    pathsAndLabels = []
    label_i = 0
    data_list = glob.glob(path + '\\*')
    datatxt = open('whoiswho.txt' ,'w')
    print('data_list', data_list)
    for dataFolderName in data_list:
        pathsAndLabels.append([dataFolderName, label_i])
        pattern = r".*\\(.*)" #pathが階層を色々含んでいるので、画像が入っているフォルダ名だけを取っている。
        matchOB = re.finditer(pattern, dataFolderName)
        directoryname = ""
        if matchOB:
            for a in matchOB:
                directoryname += a.groups()[0]
        datatxt.write(directoryname + "," + str(label_i) + "\n") # 誰が何番かテキストで保存しとく
        label_i = label_i + 1
    datatxt.close()
    allData = []
    for pathAndLabel in pathsAndLabels: # 全画像のパスとそのラベルをタプルでリストにし
        path = pathAndLabel[0]
        label = pathAndLabel[1]
        imagelist = glob.glob(path + "\\*")
        for imgName in imagelist:
            allData.append((imgName, label))
    allData = np.random.permutation(allData) # シャッフルする。

    train_x = []
    train_y = []
    for (imgpath, label) in allData: #kerasが提供しているpreprocessing.imageでは画像の前処理のメソッドがある。
        img = load_img(imgpath, target_size=(img_width,img_height)) # 画像を読み込む
        imgarry = img_to_array(img) # 画像ファイルを学習のためにarrayに変換する。
        train_x.append(imgarry)
        train_y.append(label)

    threshold = (train_test_ratio[0]*len(train_x))//(train_test_ratio[0]+train_test_ratio[1])
    test_x = np.array(train_x[threshold:])
    test_y = np.array(train_y[threshold:])
    train_x = np.array(train_x[:threshold])
    train_y = np.array(train_y[:threshold])

    return (train_x, train_y), (test_x, test_y)
学習
$ python .\train.py
Using TensorFlow backend.
data_list ['D:\\forwin\\deepLearning\\nogi_images\\images\\0_the_others', 'D:\\forwin\\deepLearning\\nogi_images\\images\\akimoto', 'D:\\forwin\\deepLearnin
g\\nogi_images\\images\\hashimoto', 'D:\\forwin\\deepLearning\\nogi_images\\images\\ikoma', 'D:\\forwin\\deepLearning\\nogi_images\\images\\ikuta', 'D:\\for
win\\deepLearning\\nogi_images\\images\\nishino', 'D:\\forwin\\deepLearning\\nogi_images\\images\\shiraishi']
Train on 2354 samples, validate on 393 samples
Epoch 1/30
2017-06-03 16:16:51.249284: W c:\tf_jenkins\home\workspace\release-win\device\gpu\os\windows\tensorflow\core\platform\cpu_feature_guard.cc:45] The TensorFlo
w library wasn't compiled to use SSE instructions, but these are available on your machine and could speed up CPU computations.
2017-06-03 16:16:51.249426: W c:\tf_jenkins\home\workspace\release-win\device\gpu\os\windows\tensorflow\core\platform\cpu_feature_guard.cc:45] The TensorFlo
w library wasn't compiled to use SSE2 instructions, but these are available on your machine and could speed up CPU computations.
2017-06-03 16:16:51.249870: W c:\tf_jenkins\home\workspace\release-win\device\gpu\os\windows\tensorflow\core\platform\cpu_feature_guard.cc:45] The TensorFlo
w library wasn't compiled to use SSE3 instructions, but these are available on your machine and could speed up CPU computations.
2017-06-03 16:16:51.250132: W c:\tf_jenkins\home\workspace\release-win\device\gpu\os\windows\tensorflow\core\platform\cpu_feature_guard.cc:45] The TensorFlo
w library wasn't compiled to use SSE4.1 instructions, but these are available on your machine and could speed up CPU computations.
2017-06-03 16:16:51.250631: W c:\tf_jenkins\home\workspace\release-win\device\gpu\os\windows\tensorflow\core\platform\cpu_feature_guard.cc:45] The TensorFlo
w library wasn't compiled to use SSE4.2 instructions, but these are available on your machine and could speed up CPU computations.
2017-06-03 16:16:51.251505: W c:\tf_jenkins\home\workspace\release-win\device\gpu\os\windows\tensorflow\core\platform\cpu_feature_guard.cc:45] The TensorFlo
w library wasn't compiled to use AVX instructions, but these are available on your machine and could speed up CPU computations.
2017-06-03 16:16:51.251783: W c:\tf_jenkins\home\workspace\release-win\device\gpu\os\windows\tensorflow\core\platform\cpu_feature_guard.cc:45] The TensorFlo
w library wasn't compiled to use AVX2 instructions, but these are available on your machine and could speed up CPU computations.
2017-06-03 16:16:51.252292: W c:\tf_jenkins\home\workspace\release-win\device\gpu\os\windows\tensorflow\core\platform\cpu_feature_guard.cc:45] The TensorFlo
w library wasn't compiled to use FMA instructions, but these are available on your machine and could speed up CPU computations.
2017-06-03 16:16:51.577805: I c:\tf_jenkins\home\workspace\release-win\device\gpu\os\windows\tensorflow\core\common_runtime\gpu\gpu_device.cc:887] Found dev
ice 0 with properties:
name: GeForce GTX 1050 Ti
major: 6 minor: 1 memoryClockRate (GHz) 1.392
pciBusID 0000:01:00.0
Total memory: 4.00GiB
Free memory: 3.32GiB
2017-06-03 16:16:51.577926: I c:\tf_jenkins\home\workspace\release-win\device\gpu\os\windows\tensorflow\core\common_runtime\gpu\gpu_device.cc:908] DMA: 0
2017-06-03 16:16:51.579198: I c:\tf_jenkins\home\workspace\release-win\device\gpu\os\windows\tensorflow\core\common_runtime\gpu\gpu_device.cc:918] 0:   Y
2017-06-03 16:16:51.579586: I c:\tf_jenkins\home\workspace\release-win\device\gpu\os\windows\tensorflow\core\common_runtime\gpu\gpu_device.cc:977] Creating
TensorFlow device (/gpu:0) -> (device: 0, name: GeForce GTX 1050 Ti, pci bus id: 0000:01:00.0)
2354/2354 [==============================] - 14s - loss: 1.6099 - acc: 0.4571 - val_loss: 1.3219 - val_acc: 0.5827
Epoch 2/30
2354/2354 [==============================] - 11s - loss: 1.0838 - acc: 0.6206 - val_loss: 0.9719 - val_acc: 0.6539
Epoch 3/30
2354/2354 [==============================] - 11s - loss: 0.8529 - acc: 0.7022 - val_loss: 0.9590 - val_acc: 0.6794
Epoch 4/30
2354/2354 [==============================] - 11s - loss: 0.7101 - acc: 0.7685 - val_loss: 0.9310 - val_acc: 0.6768
Epoch 5/30
2354/2354 [==============================] - 11s - loss: 0.5977 - acc: 0.7935 - val_loss: 0.7474 - val_acc: 0.7150
Epoch 6/30
2354/2354 [==============================] - 11s - loss: 0.4693 - acc: 0.8386 - val_loss: 0.7349 - val_acc: 0.7634
Epoch 7/30
2354/2354 [==============================] - 11s - loss: 0.3611 - acc: 0.8768 - val_loss: 0.8088 - val_acc: 0.7328
Epoch 8/30
2354/2354 [==============================] - 11s - loss: 0.2873 - acc: 0.8985 - val_loss: 0.6574 - val_acc: 0.8015
Epoch 9/30
2354/2354 [==============================] - 11s - loss: 0.2519 - acc: 0.9129 - val_loss: 0.7998 - val_acc: 0.7735
Epoch 10/30
2354/2354 [==============================] - 11s - loss: 0.2004 - acc: 0.9350 - val_loss: 0.8732 - val_acc: 0.7684
Epoch 11/30
2354/2354 [==============================] - 11s - loss: 0.1950 - acc: 0.9376 - val_loss: 0.7465 - val_acc: 0.7964
Epoch 12/30
2354/2354 [==============================] - 11s - loss: 0.1400 - acc: 0.9494 - val_loss: 0.7360 - val_acc: 0.8041
Epoch 13/30
2354/2354 [==============================] - 11s - loss: 0.0927 - acc: 0.9673 - val_loss: 0.8668 - val_acc: 0.8142
Epoch 14/30
2354/2354 [==============================] - 11s - loss: 0.0902 - acc: 0.9647 - val_loss: 0.7354 - val_acc: 0.8372
Epoch 15/30
2354/2354 [==============================] - 11s - loss: 0.1122 - acc: 0.9579 - val_loss: 0.7828 - val_acc: 0.8066
Epoch 16/30
2354/2354 [==============================] - 11s - loss: 0.0982 - acc: 0.9707 - val_loss: 1.0783 - val_acc: 0.7863
Epoch 17/30
2354/2354 [==============================] - 11s - loss: 0.1339 - acc: 0.9575 - val_loss: 1.0563 - val_acc: 0.7735
Epoch 18/30
2354/2354 [==============================] - 11s - loss: 0.1289 - acc: 0.9562 - val_loss: 0.9549 - val_acc: 0.7939
Epoch 19/30
2354/2354 [==============================] - 11s - loss: 0.0929 - acc: 0.9677 - val_loss: 0.7774 - val_acc: 0.8015
Epoch 20/30
2354/2354 [==============================] - 11s - loss: 0.0662 - acc: 0.9788 - val_loss: 0.7677 - val_acc: 0.8372
Epoch 21/30
2354/2354 [==============================] - 11s - loss: 0.0905 - acc: 0.9720 - val_loss: 1.0242 - val_acc: 0.7812
Epoch 22/30
2354/2354 [==============================] - 11s - loss: 0.0733 - acc: 0.9775 - val_loss: 0.7614 - val_acc: 0.8219
Epoch 23/30
2354/2354 [==============================] - 11s - loss: 0.0395 - acc: 0.9877 - val_loss: 0.8486 - val_acc: 0.8372
Epoch 24/30
2354/2354 [==============================] - 11s - loss: 0.0396 - acc: 0.9843 - val_loss: 1.0073 - val_acc: 0.7888
Epoch 25/30
2354/2354 [==============================] - 11s - loss: 0.0341 - acc: 0.9902 - val_loss: 0.9374 - val_acc: 0.8092
Epoch 26/30
2354/2354 [==============================] - 11s - loss: 0.0472 - acc: 0.9851 - val_loss: 1.0889 - val_acc: 0.8015
Epoch 27/30
2354/2354 [==============================] - 11s - loss: 0.1202 - acc: 0.9618 - val_loss: 1.1969 - val_acc: 0.7786
Epoch 28/30
2354/2354 [==============================] - 654s - loss: 0.1190 - acc: 0.9669 - val_loss: 1.2336 - val_acc: 0.7939
Epoch 29/30
2354/2354 [==============================] - 11s - loss: 0.1724 - acc: 0.9511 - val_loss: 1.4932 - val_acc: 0.7913
Epoch 30/30
2354/2354 [==============================] - 11s - loss: 0.1195 - acc: 0.9698 - val_loss: 0.9864 - val_acc: 0.8168
Test loss: 0.986444676195
Test accuracy: 0.816793893433
予測
保存したモデルファイルを使って実際に予測するコード。
顔を抜き出すときにカスケードファイルが必要なので、保存してlib/においてください。
from keras.models import Sequential, load_model
from keras.preprocessing.image import load_img, img_to_array
import numpy as np
import argparse
import cv2
from PIL import Image
def faceDetectionFromPath(path, size):
cvImg = cv2.imread(path)
cascade_path = "./lib/haarcascade_frontalface_alt.xml"
cascade = cv2.CascadeClassifier(cascade_path)
facerect = cascade.detectMultiScale(cvImg, scaleFactor=1.1, minNeighbors=1, minSize=(1, 1))
faceData = []
for rect in facerect:
faceImg = cvImg[rect[1]:rect[1]+rect[3],rect[0]:rect[0]+rect[2]]
resized = cv2.resize(faceImg,None, fx=float(size/faceImg.shape[0]),fy=float( size/faceImg.shape[1]))
CV_im_RGB = resized[:, :, ::-1].copy()
pilImg=Image.fromarray(CV_im_RGB)
faceData.append(pilImg)
return faceData
def main():
parser = argparse.ArgumentParser()
parser.add_argument('--model', '-m', default='.\\mymodel.h5', required=True)
parser.add_argument('--testpath', '-t', default='.\\images\\shiraishi.jpg')
args = parser.parse_args()
num_classes = 7
img_rows, img_cols = 128, 128
ident = [""] * num_classes
for line in open("whoiswho.txt", "r"):
dirname = line.split(",")[0]
label = line.split(",")[1]
ident[int(label)] = dirname
model = load_model(args.model)
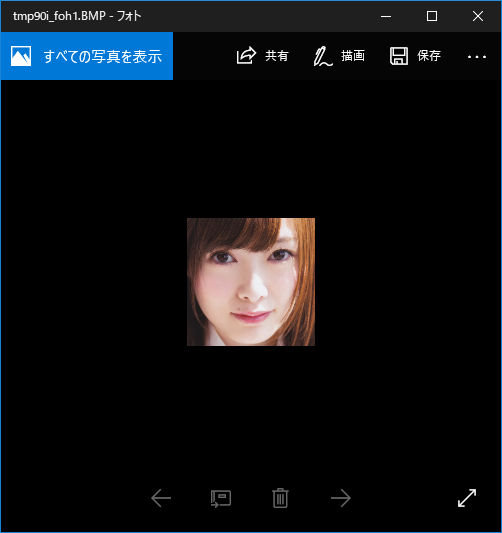
faceImgs = faceDetectionFromPath(args.testpath, img_rows)
imgarray = []
for faceImg in faceImgs:
faceImg.show()
imgarray.append(img_to_array(faceImg))
imgarray = np.array(imgarray) / 255.0
imgarray.astype('float32')
preds = model.predict(imgarray, batch_size=imgarray.shape[0])
for pred in preds:
predR = np.round(pred)
for pre_i in np.arange(len(predR)):
if predR[pre_i] == 1:
print("he/she is {}".format(ident[pre_i]))
if __name__ == '__main__':
main()
この画像を指定して、実行する。
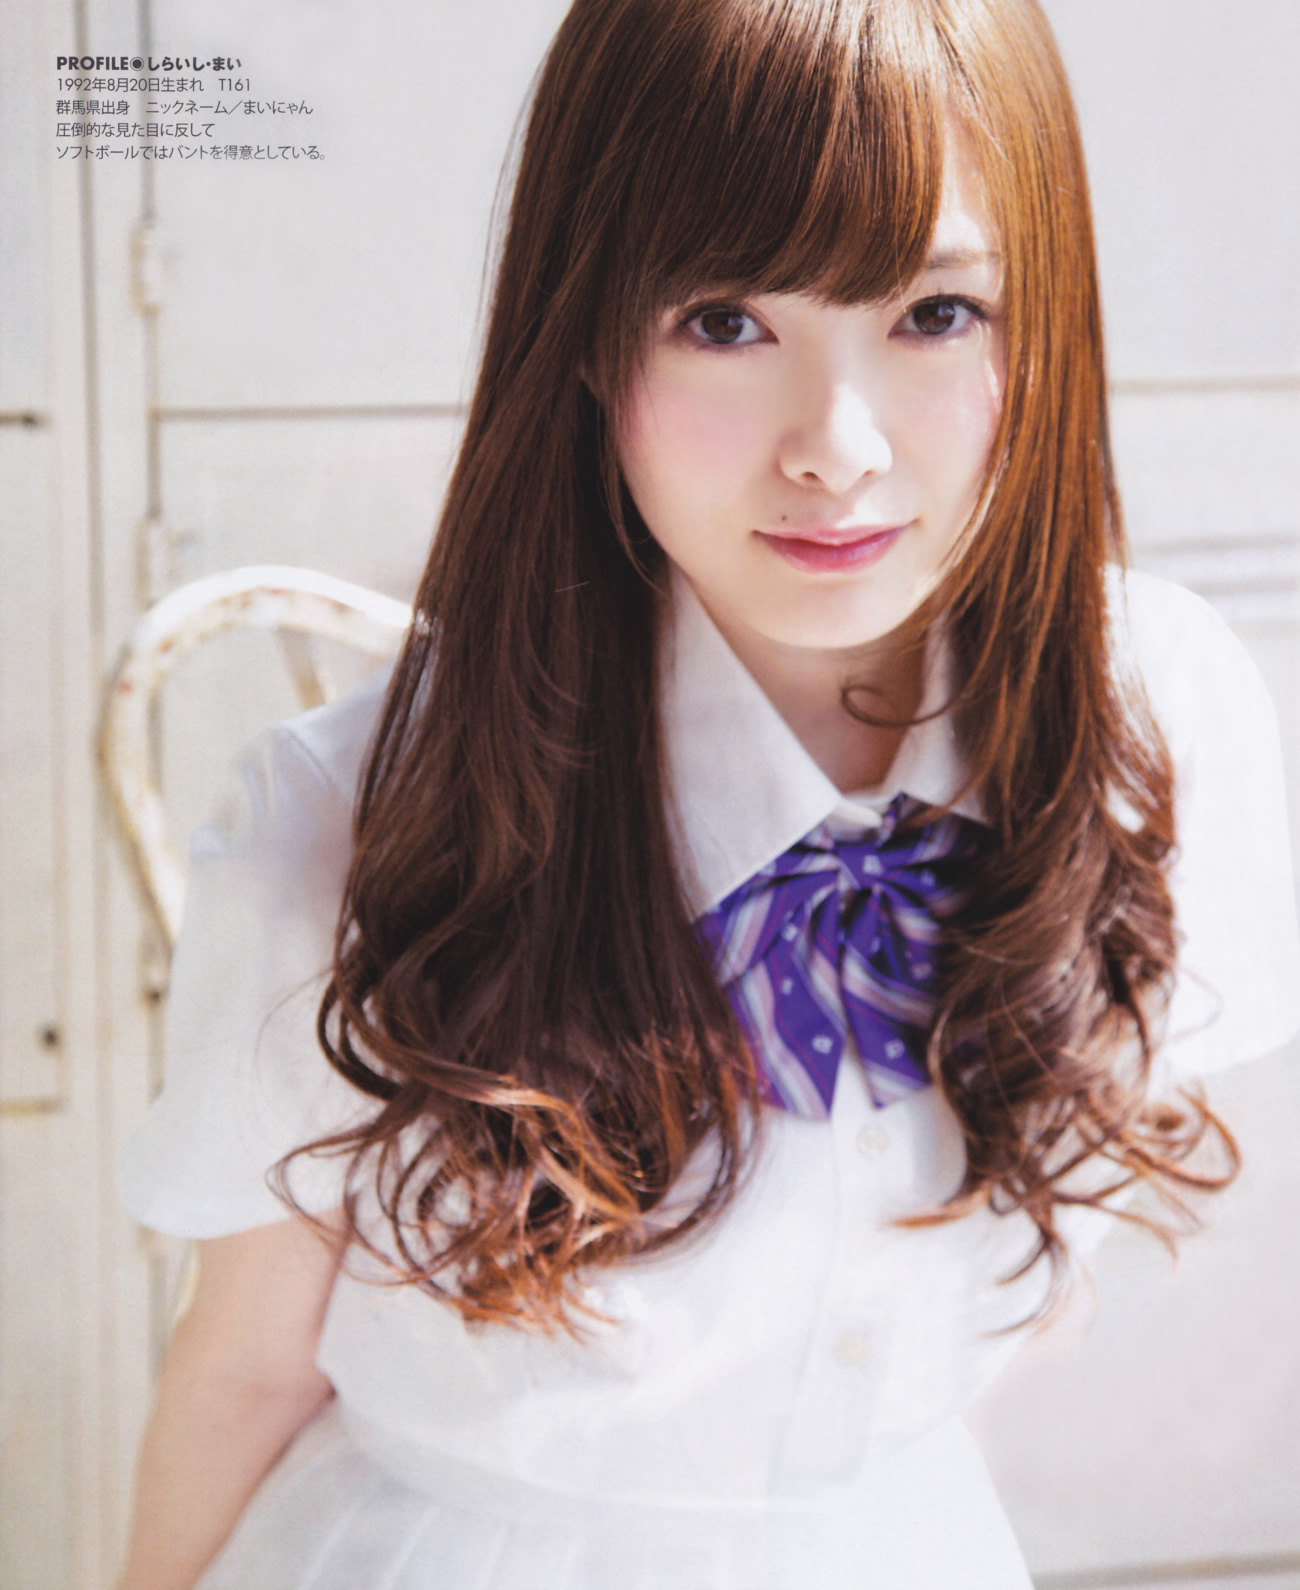
[tensorflow] $ python .\prediction.py -m .\mymodel.h5
Using TensorFlow backend.
2017-06-03 19:16:43.844870: W c:\tf_jenkins\home\workspace\release-win\device\gpu\os\windows\tensorflow\core\platform\cpu_feature_guard.cc:45] The TensorFlo
w library wasn't compiled to use SSE instructions, but these are available on your machine and could speed up CPU computations.
2017-06-03 19:16:43.844982: W c:\tf_jenkins\home\workspace\release-win\device\gpu\os\windows\tensorflow\core\platform\cpu_feature_guard.cc:45] The TensorFlo
w library wasn't compiled to use SSE2 instructions, but these are available on your machine and could speed up CPU computations.
2017-06-03 19:16:43.846376: W c:\tf_jenkins\home\workspace\release-win\device\gpu\os\windows\tensorflow\core\platform\cpu_feature_guard.cc:45] The TensorFlo
w library wasn't compiled to use SSE3 instructions, but these are available on your machine and could speed up CPU computations.
2017-06-03 19:16:43.846776: W c:\tf_jenkins\home\workspace\release-win\device\gpu\os\windows\tensorflow\core\platform\cpu_feature_guard.cc:45] The TensorFlo
w library wasn't compiled to use SSE4.1 instructions, but these are available on your machine and could speed up CPU computations.
2017-06-03 19:16:43.847155: W c:\tf_jenkins\home\workspace\release-win\device\gpu\os\windows\tensorflow\core\platform\cpu_feature_guard.cc:45] The TensorFlo
w library wasn't compiled to use SSE4.2 instructions, but these are available on your machine and could speed up CPU computations.
2017-06-03 19:16:43.847555: W c:\tf_jenkins\home\workspace\release-win\device\gpu\os\windows\tensorflow\core\platform\cpu_feature_guard.cc:45] The TensorFlo
w library wasn't compiled to use AVX instructions, but these are available on your machine and could speed up CPU computations.
2017-06-03 19:16:43.847949: W c:\tf_jenkins\home\workspace\release-win\device\gpu\os\windows\tensorflow\core\platform\cpu_feature_guard.cc:45] The TensorFlo
w library wasn't compiled to use AVX2 instructions, but these are available on your machine and could speed up CPU computations.
2017-06-03 19:16:43.848033: W c:\tf_jenkins\home\workspace\release-win\device\gpu\os\windows\tensorflow\core\platform\cpu_feature_guard.cc:45] The TensorFlo
w library wasn't compiled to use FMA instructions, but these are available on your machine and could speed up CPU computations.
2017-06-03 19:16:44.117985: I c:\tf_jenkins\home\workspace\release-win\device\gpu\os\windows\tensorflow\core\common_runtime\gpu\gpu_device.cc:887] Found dev
ice 0 with properties:
name: GeForce GTX 1050 Ti
major: 6 minor: 1 memoryClockRate (GHz) 1.392
pciBusID 0000:01:00.0
Total memory: 4.00GiB
Free memory: 3.32GiB
2017-06-03 19:16:44.118111: I c:\tf_jenkins\home\workspace\release-win\device\gpu\os\windows\tensorflow\core\common_runtime\gpu\gpu_device.cc:908] DMA: 0
2017-06-03 19:16:44.119410: I c:\tf_jenkins\home\workspace\release-win\device\gpu\os\windows\tensorflow\core\common_runtime\gpu\gpu_device.cc:918] 0:   Y
2017-06-03 19:16:44.119459: I c:\tf_jenkins\home\workspace\release-win\device\gpu\os\windows\tensorflow\core\common_runtime\gpu\gpu_device.cc:977] Creating
TensorFlow device (/gpu:0) -> (device: 0, name: GeForce GTX 1050 Ti, pci bus id: 0000:01:00.0)
he/she is shiraishi
実行するとこのように画像を切り出し入力に用いて予測する。最後の行でshi is shiraishiと正しくできています。
が所詮テストデータで正解率80%弱なので、結構間違えます。
学習データが少なすぎるので(300枚行かないぐらい)当たり前ではありますが、、、